
The Mathematics of Dobble
John Longley, School of Informatics,
Smriti Subedi, BEng Software Engineering,
University of Edinburgh
Let’s start by thinking about the most familiar kind of geometry: the world of points and lines in a flat two-dimensional plane that extends infinitely in all directions. (This kind of geometry is often associated with the Greek mathematician Euclid.) For us, a line will mean a straight line extending infinitely in both directions. Perhaps the most fundamental fact about this kind of geometry is the following:
In other words, given any two distinct points, there is one, and only one, straight line that passes through them both.
Does this remind you of something? There’s a close resemblance here to the fundamental rule of Dobble:
This suggests that we can perhaps make some meaningful connection between Dobble and geometry based on the following correspondences:
This is the idea we’re going to explore.
To see how far we can push this, let’s now think about the dual of the above property. In Dobble terms, this would be the property that defines complete Dobble systems:
What happens if we try carrying this over to a geometrical statement?
Is this true in the world of plane geometry? In most cases, yes: two straight lines will intersect in one, and only one, point. However, there is an exceptional case: if the two lines are parallel, they won’t have any point in common at all.

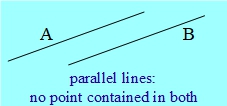
So if the world of points and lines in plane geometry is in some way like a Dobble system, then it’s like a Dobble system that’s not quite complete, because it isn’t quite true that any two lines have exactly one point in common. But it’s nearly true – so perhaps there’s some chance of tweaking something to make it true? Perhaps there’s some slightly different kind of geometry in which any two lines have a point in common? We’ll see that there is indeed such a thing: a brand of geometry known as projective geometry.
What might we hope to gain from forging a connection between Dobble and geometry? Two things, maybe:
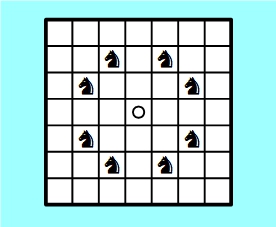
Here’s one example of a simple geometrical world that’s fairly easy to depict. This is an example known as the Fano plane: it’s a world in which there are just 7 points and 7 lines altogether.
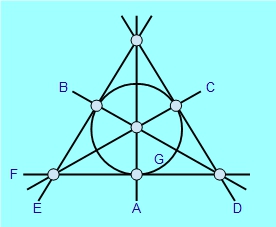
The seven ‘points’ are represented by the seven grey blobs. You’ll see that these blobs are connected in the diagram by six straight lines. These represent six of the ‘lines’ within this geometrical world, while the circle in the middle is given the honorary status of the seventh ‘line’.
It might seem that we’re cheating by branding this circle as a ‘line’. But the way to think of it is that the diagram above is only a picture of a structure that exists mathematically ‘in its own right’ – and within this structure, the seventh ‘line’ is an ordinary line like any other. When we try to depict this structure in ordinary two-dimensional space, it’s inevitable that a bit of ‘distortion’ creeps in – just as some sort of distortion creeps in whenever we try to map the whole of the Earth’s surface on a flat sheet of paper.
A second kind of imperfection in the diagram is that the circle appears to cross three of the lines in other points that we’re not counting as ‘points’ of the space. Again, these crossings are just artefacts of our depiction and should be ignored.
Take a few moments to satisfy yourself that this new geometry perfectly satisfies both the properties mentioned earlier:
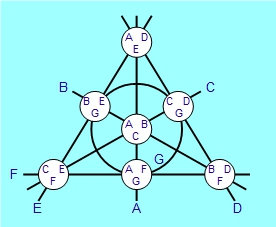
What happens if we now try to ‘translate’ this geometrical world into a Dobble system? We want lines to correspond to symbols, and points to cards. You’ll see that I’ve labelled the lines with the letters A,B,C,D,E,F,G, and we’ll use these as our symbols. (The circle is labelled G.) So now let’s imagine that each of the seven points is a little Dobble card, and let’s fill each card with the symbols for the lines that pass through that point. For instance, the point in the centre is where the three lines labelled A, B and C all meet, so we fill that card with these three symbols. Here’s what we end up with:
This illustrates an important point about the way mathematical theories often work. When we develop a theory, we’re likely to use certain key terms – for instance, in geometry we speak of ‘points’ and ‘lines’. However, the actual development of the theory needn’t be especially tied to any particular meanings we associate with these terms. We’re free to change the meanings we have in mind – or the choice of words we use – as long as the key properties on which the theory is based are still satisfied. The great mathematician David Hilbert, when speaking of geometry, is said to have joked that in place of points, lines and planes it must always be possible to speak of tables, chairs and beer-mugs. I think Hilbert would have loved Dobble – not only because he did a lot of important work in the sorts of geometry we’re looking at here, but also because it provides a perfect example of what he was talking about: a theory originally developed to talk about points and lines can also be applied to cards and symbols.
It might seem puzzling that we’re associating points with cards and lines with symbols, rather than the other way round. After all, it’s natural to think of a line as containing certain points, and a card as containing certain symbols – so haven’t we got it back-to-front by associating cards with points rather than lines? Ultimately, we’re free to make whichever choice we prefer. And although the choice I’ve made might seem confusing at first, we’ll see that it’s the better choice in the long run.
To begin with, we’ll introduce a simple geometrical world such as you might find in a computer game. This world is basically just a 7×7 grid of squares, and the only ‘points’ in the space – or positions that a game character can occupy – are these 49 individual squares. (Why 7? Well, 7 is one less than 8, and we’re heading for a Level 8 Dobble system here. All will be revealed in due course!)
To get the idea of this world, click on any one of the squares below to position the character – in this case, a LADYBIRD – then use the four arrow buttons to move it around. (Clicking the central button places a spot in the ladybird’s current square, allowing you to trace out patterns. Double-clicking this central button clears all spots.)
You’ll notice that if you try to move the ladybird off the right hand edge of the grid, it reappears on the left-hand side in the same row. So it’s as though the right and left edges have been wrapped around and glued together at the back. This isn’t too different from how a map of the world: a traveller whose position went off the right hand edge of the map would ‘reappear’ on the left. There are also computer games such as Snake whose world has this feature.
The same applies to vertical movement: if you try to move the ladybird off the bottom of the grid, it will reappear at the top. So it’s as if the bottom and top edges have also been glued together. At this point, the analogy with the map of the world breaks down. However, you can visualize this double wrap-around process like this: starting with a square sheet of rubber, first bend it round to form a cylinder, then stretch and bend the cylinder so that the two ends join up, forming a torus or doughnut shape.
So much for the points of this space and how they’re arranged. But what do we mean by a line in this space? We are going to take the following point of view: a line is a set of points that can be traced out by choosing some starting point, choosing a direction to move in, then repeatedly moving in that direction.
We can illustrate this using the grid above. To make an example of a line, choose any starting square and place the ladybird there, then decide on one of the four arrows as your direction. Then repeatedly perform the following: put a spot in the current square, then move one step in your chosen direction. After seven steps, you will find that you have returned to your starting point, and you will have traced out a ‘line’ in the process – either a horizontal or a vertical one.
Are there other kinds of ‘lines’ besides these? What if we choose a starting point and then move in a diagonal direction – for instance, upward and to the right? You can see what happens by redoing the above experiment, alternately placing a spot and clicking two arrow keys in order to perform a diagonal step.
Try this from various starting squares. You’ll see that wherever you start, you will return after seven steps to the same point. In some cases, the route you trace out will be one of the diagonals of the square, but in most cases it will look more like two segments of line. Even in the latter case, though, we’ll think of the route as just a single line in this world’s geometry, because it’s obtained by choosing a starting point and then repeatedly performing steps in the same direction. (Imagine the ladybird moving around on the surface of our torus. From the ladybird’s point of view, all steps look the same – she won’t notice anything unusual when she crosses over an edge of the original square, any more than our round-the-world traveller would notice anything unusual when passing off the edge of the map.)
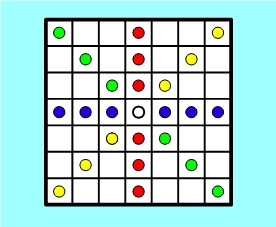
We’ve now seen that there are four lines through any chosen starting point: one horizontal, one vertical, and two diagonal. (Clearly, each of these can be traced out in either of two directions, e.g. left/right, up/down.) For instance, if our starting point is the central square of the grid, these four lines may be shown in different colours as follows:
Are these all of the lines through our chosen point? From the point of view of geometry, they’d better not be! We want it to be true that for any two points there’s a line containing both, whereas the above picture shows that there are plenty of points that aren’t joined to the central point by any line (so far). Of these points, those closest to the centre are the eight points that can be reached from the centre square by a knight’s move in chess: two squares horizontally and one vertically, or the other way round.
So what happens if we also add these knight’s moves as permissible ways to trace out a line?
Go back to the grid above, and choose some ‘knight’s move direction’ to move in (for instance, two squares up and one to the right). You can move the ladybird by such a knight’s move using three arrow clicks. Starting from any square you like, move repeatedly in your chosen direction, tracing out your route by leaving spots. (Take note of the effect of wrap-around as you do so!) Once again, you will return in seven steps to your starting point.
This time, the route you have traced out will appear just as a pattern of dots, and won’t look at all like a ‘line’ in the ordinary sense. Nevertheless, we are going to count such routes as ‘lines’ in the sense of this special geometry, since – once again – they’re obtained by picking a starting point and repeatedly moving in the same direction.
The following version of our grid will make it easier for you to trace out lines in this space. Each of the move types we’ve mentioned can now be performed by clicking a single button on the navigation pad, and the ladybird will automatically leave a trail of spots in its wake. Clicking on the central square of this pad will cycle through a choice of ten spot colours (including white, which effectively means ‘no spot’). Again, double-clicking the central square will clear all spots.
Here’s a little exercise that takes less than a minute to do. Select any ‘starting square’ you like, and place the ladybird there. Then pick any spot colour you like, and choose a direction to move in, represented by one of the arrow or knight buttons. Pressing this button 7 times will trace out the corresponding line and return you to the starting square. (Note that all the lines we’ve discussed have exactly 7 points.) Now pick a different spot colour and repeat the process, tracing out a line in a different direction. Repeat this until you have traced out all 8 lines through the starting square in 8 different colours. (We shall say that these 8 lines have 8 different slopes, where each slope is represented by two opposite directions. Since we only need to trace out each line once, you will only need to use half of the 16 available direction buttons to do this.)
You will notice that in the course of doing this, every square except the starting square is visited once and only once. That is, excluding the starting square, every square will get coloured, and its colour will not be overwritten with another colour later on. This tells us that for each of these squares, there is one and only one line that contains both it and the starting square. And because all of this is true whatever starting square we pick, this means that any two points have one and only one line in common – precisely the property we are wanting for our geometrical system.
Why does this work? You can see by playing with the grid above that it does work – but is this just ‘coincidence’, or is there some good mathematical reason for it? Indeed there is a good reason, and it has to do with the fact that 7 is a prime number. If you tried the same thing with a 6 × 6 grid, for example, things wouldn’t work out so nicely.
Quiz question 1: The space we’ve described so far has 49 points. How many lines does it have altogether?
Quiz question 2: It would seem that other line slopes are possible besides the 8 we’ve mentioned. For instance, we might consider a ‘super-knight’ move that went 3 steps down and 2 to the right. What happens if we try to trace out a line by repeatedly making a move of this kind?
To summarize: We’ve succeeded in constructing a geometrical world involving 49 points and a certain collection of lines between them. We've seen that our geometry satisfies two key properties:
Do the above two properties remind you of anything? We have proposed the idea of forging a connection between geometry and Dobble by translating points as cards, and lines as symbols. If we now apply this translation to the two properties above, we get this:
Which are precisely the properties that define a Level 8 Dobble system!
Earlier, we noted that a Level 8 Dobble system (of reasonable size) would probably be very hard to construct by pure trial-and-error. But we can now see how we can do this in a systematic way. We’ve already succeeded in constructing a geometrical world that satisfies the relevant properties. So all we need to do now is to ‘translate’ this world into a Dobble system. Admittedly this won’t yet be the full set as it will only have 49 cards, but that’s already pretty good going.
Let's spell out how this works. Here’s how we can transform our geometry into a Dobble system:
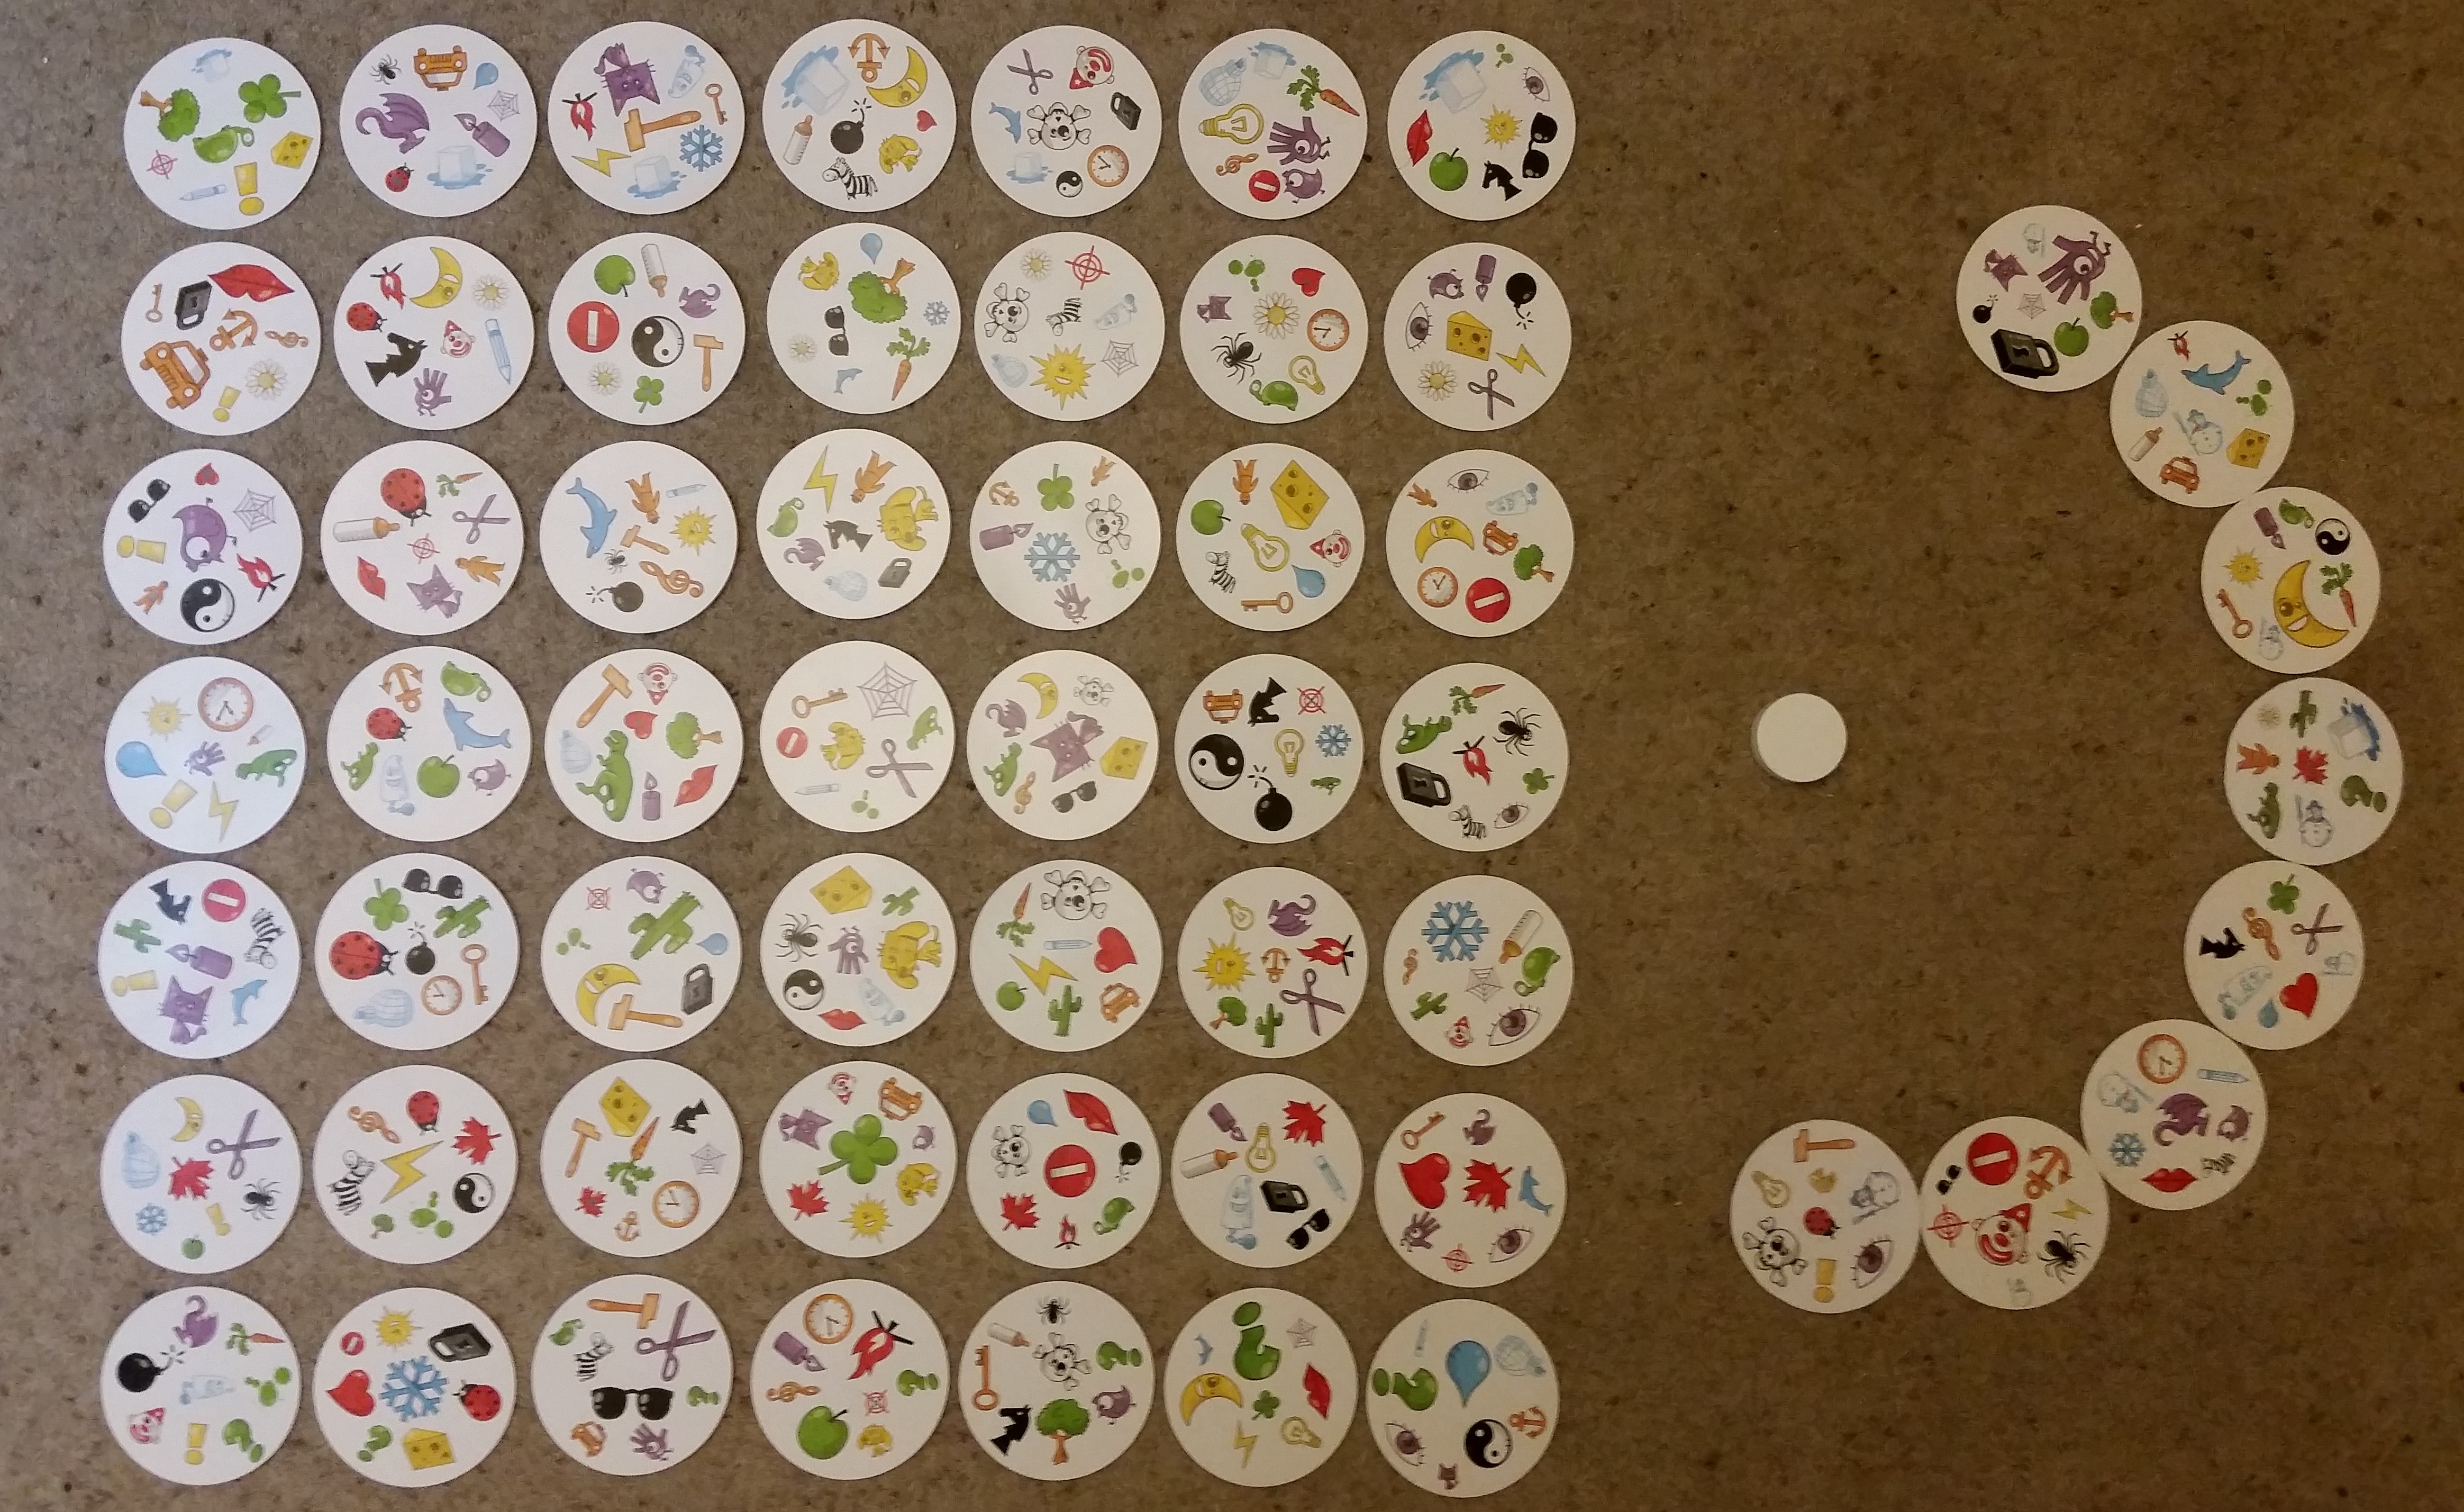
By zooming in on this picture, you will see that (for example) all the cards on the central vertical line contain the yellow DOG, all those on the central horizontal line contain the green DINOSAUR … and so on for all of the other lines of our geometry. So this grid has exactly the form we’d obtain by following the recipe above.
This will be brought to life much more vividly if you take the time to lay out the above grid yourself, following the instructions below. You will need a standard Dobble pack and a flat horizontal surface of at least 60cm×60cm. This might take about 15 minutes the first time you do it, but it’s well worth it for the wealth of patterns that such a grid possesses.
First go through the pack and set aside the 6 cards containing the SNOWMAN (more about him later!). These cards will not feature in our grid.
To arrange the remaining 49 cards in a 7×7 grid, we can exploit the fact that each row and column of the grid is a line in the sense of our geometry, and as such is associated with some symbol which appears on every card in that row or column. Specifically, the rows (in top-to-bottom order) are labelled with the symbols:
And the columns (in left-to-right order) are labelled with:
Or more pictorially:
Now, because each of our 49 cards will belong in exactly one row and exactly one column, we can use these row and column symbols as a coordinate system that tells us where to place any given card. For instance, if a card contains both the DAISY and the HAMMER, we know it must belong in the second row and the third column.
It may be easiest to start by finding the seven cards containing the ICE-CUBE, and arranging them as the top row of the grid, ordered according to the column symbol they contain. Next, find the other six cards containing the EXCLAMATION-MARK, and arrange them as the left column, ordered according to the row symbol they contain. (The top-left card will of course contain both ICE-CUBE and EXCLAMATION-MARK.) Having done this, it will then be clear where to put each of the remaining 36 cards.
Now step back and admire your handiwork. Try to pick out a few of the lines that we’ve been discussing, with horizontal, vertical, diagonal and knight’s move slopes. In each case, you’ll see that there is one particular symbol that’s common to all 7 cards on this line. Or conversely, you might try picking some symbol and locating all the cards that contain it – you will see that they all fall nicely into one of our 56 lines.
With a bit of practice, you’ll be able to re-create this magical arrangement within about 5 minutes – especially if you take the time to memorize the sequences of row and column symbols listed above. Re-creating this display rapidly from memory will astonish your friends who don’t know the secret!
Obviously this arrangement of cards is quite special, and very far from ‘random’ – but is it the only possible arrangement with this property? In fact, no: it turns out that with a standard Dobble pack, there are 98,784 possible grids of this kind! Some can be obtained via relatively simple modifications of the grid we’ve presented, but others require a little more invention. You might enjoy experimenting to see what other grids you can come up with.
What we’ve constructed so far is already a pretty respectable Level 8 Dobble system. But as you may gather from the fact that there are still some cards left over, it’s not yet a complete Dobble system. That is to say, it’s not yet the case that any two symbols have a card in common.
Try choosing any two symbols you like, and locating the corresponding lines in the grid. Most of the time, you will find that these lines will intersect in one and only one card, which will contain both of your symbols. Indeed, this will always happen provided your two lines have different slopes. (This again is one of the good things that happen because 7 is a prime number). But if your two lines happen to be parallel, then – just as in ordinary plane geometry – these lines will never meet. For instance:
Might it be possible to extend our geometry with some extra points so as to ensure that such parallel pairs of lines do meet? If we can do this, that might also give us a way of squeezing a few extra cards into our Dobble set, perhaps even making it up to a complete set.
Look again at the symbols labelling the 7 horizontal rows as listed above: ICE-CUBE, DAISY, GINGERBREAD-MAN, DINOSAUR, CACTUS, MAPLE-LEAF, QUESTION-MARK. These correspond to a set of 7 parallel lines, so no two of these symbols ever appear together on the same card. So why don’t we try adding a new card that contains all 7 of these symbols? That will ensure, geometrically, that any two horizontal parallel lines now meet in one and only one point – and in Dobble terms, that any two of the above symbols now have a card in common.
You may sometimes hear people say (in a loose manner of speaking) that ‘parallel lines meet at infinity’. So a possible way to think of this new card is that it corresponds to a hypothetical new point infinitely far off in a horizontal direction, where these parallel lines meet. Actually, there’s a difficulty with this idea, because you’ll immediately want to know whether I mean infinitely far to the left or the right. Of course, it can be either – or both! So if we want to think in terms of a ‘point at infinity’, we must qualify this with the idea that there is again some kind of wrap-around at work: going infinitely far to the left is the same as going infinitely far to the right.
We can do a similar thing for any of the other 7 line slopes. For instance, look at the 7 diagonal lines that run ‘top left to bottom right’. The associated symbols are PENCIL, LIPS, BIRD, CLOCK, ZEBRA, SNOWFLAKE, DRAGON. At the moment, there’s no card containing two of these symbols. So let’s add a new card that contains these 7 symbols, and that will plug this gap.
So we’re proposing that we add 8 fresh points/cards to our system – one for each of the 8 line directions. As we’ve noted, it’s possible to think of these as ‘points at infinity’, but here we shall usually refer to these 8 new cards as direction cards, in contrast to the 49 grid cards that we have already. Once we’ve added all of these direction cards, it will then indeed be the case that any two of the 56 lines in our grid meet in one, and only one, point – and therefore that any two of our 56 symbols have exactly one card in common.
What’s more, it will automatically true that if you pick any grid card and any slope card, they will have just one symbol in common, in accordance with the basic Dobble rule. This is because we can always construct a line with the relevant slope using the grid card as our starting-point. So everything seems to be fitting together well.
We now very nearly have a complete Level 8 Dobble system. However, there remain two small problems:
You might now be able to see where we’re heading: we can solve both of these problems in a single stroke! Let’s take some new symbol that doesn’t already feature in our grid – if we want to use actual Dobble symbols, this will have to be the SNOWMAN – and let’s add it to each of our slope cards as the eighth symbol. This will mean that any two slope cards now have a symbol in common. (Geometrically, we can think of this as adding one special new ‘line’ to the system – the so-called line at infinity. Admittedly, it’s not particularly easy to visualize this in ordinary spatial terms.)
There is one final thing to check. Is it now true that our Dobble system is complete – that any two symbols have a common card? As we’ve seen, the slope cards ensure that this is indeed true for any two of our original 56 symbols. But what if one of the two symbols is the newly added SNOWMAN? We want to be sure that each of the other symbols appears alongside the SNOWMAN on exactly one card. But since the slope cards together contain each of these 56 symbols once and only once, this is indeed the case.
So there we have it: a method of constructing a complete Level 8 Dobble system with 57 cards and 57 symbols. Here is what we get if we extend our grid with slope cards in this way. You will see that I’ve arranged the 8 slope cards in a half-circle around a central white spot: the radial line from this spot out to a slope card indicates the slope with which this card is associated. (We only need a half-circle rather than a full circle, as we only need to represent each slope by a single direction.)
In geometrical terms, what we’ve arrived at is a structure with 57 points and 57 lines, where any two points share just one line and any two lines share just one point. This process of ensuring the latter property by throwing some extra ‘points at infinity’ (plus a single ‘line at infinity’) is characteristic of what is known as projective geometry, and the particular geometrical space we’ve just constructed is known to mathematicians as the finite projective plane of order 7, a rich and beautiful structure possessing a very high degree of symmetry.
But now we return to a point we raised in Part I. The standard commercial Dobble set contains only 55 cards, and so is two cards short of the mathematically complete set! In particular, only 6 out of 8 of the above slope cards are actually present: those for the horizontal and vertical slopes are missing. Here are my own reconstructions of these two extra cards, which I used to create the above display.

I don’t know why the makers of Dobble chose not to include these two cards, but to anyone with a mathematical turn of mind this will seem a real shame, as it spoils the beauty and symmetry of the set. For instance, in the mathematically complete set, every symbol appears on 8 cards; whereas in the commercial set, there are 14 symbols that only appear on 7 cards, and one (the SNOWMAN) that only appears on 6 cards. Also, as we shall see, there are a number of interesting tricks and demonstrations that can be performed if these two cards are added, but which may fail if they are omitted.
For this reason – or just for the sheer satisfaction of owning a mathematically complete set – you might like to print off this pdf file which will enable you to add the missing cards to your pack. All the standard Dobble games can be played as normal with these two extra cards thrown in.
Let’s now summarize what we’ve done. The construction of our geometry consisted of two stages. First, we considered a simple geometry with just 49 points arranged in a 7×7 grid: this is an example of what’s known as an affine geometry. Then we extended this geometry with a few additional points (and one additional line) so as to ensure that even ‘parallel’ lines had a meeting-point: this resulted in a so-called projective geometry.
These two steps are largely independent of one another. For instance, we can start from the ordinary ‘Euclidean’ plane in place of our 7×7 geometry, and still perform the second step to obtain a ‘projective’ geometry. That is to say, we can start from the familiar plane with its infinitely many points and lines, then add a new ‘point at infinity’ for every possible line slope within this plane. (Of course, there will now be infinitely many line slopes rather than just 8, so this will mean adding infinitely many new points.) Finally, we add a single new ‘line at infinity’ containing all of these new points. The resulting space is known as the real projective plane.
Thinking about geometries that can be built starting from ‘ordinary’ space can be very helpful, since here our familiar experience of ordinary space can help us to understand what’s going on. Our next section provides a good illustration of this.
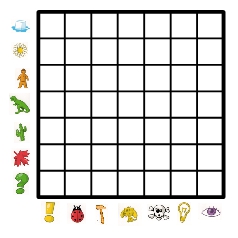
For Level 6, there are 31 cards and symbols in total. We will be using all of the English alphabets and five Greek alphabets as symbols. As you can see, the cards are arranged in 5×5 grid and 6 slope cards below the grid with an image that acts as a helper for the directions. Here, we have only 2 knight's move lines because the others are not needed as they will give you similar result.
To add a symbol to any card (or replace an existing symbol), use the symbol buttons under the card box to select the symbol you want, then click on the appropriate position within the card. Once you've finished, click 'Check answer' to see if your solution is correct.
To help you get started, symbol 'A' is added on each card in the first column of the grid and on the "vertical" direction card as an example.
The following interactive demo illustrates the connection between points in 2D space and lines through the origin in 3D space – and also between lines in 2D space and planes through the origin in 3D space.
A bit of three-dimensional imagination is needed to make sense of this demo. Think of the black dot (the origin) as a fixed point hovering somewhere in 3D space, and think of the quadrilateral figure as a square painted onto a glass wall on our left. The glass wall is infinite in all directions, and the faint vertical line indicates where it vanishes into the distance.
To start the demo, move your mouse pointer into the square and start to roll it around. This will show the correspondence between points on the wall and lines through the origin. Once this has kicked in, you may move your pointer outside the square, but must remain on the glass wall.
Clicking on a point will ‘fix’ the current point/line. You may then move around the plane again with your mouse. As you do so, you will see the line on the wall (in red) determined by the fixed point and your current point. The demo also shows (parts of) the plane through the origin that intersects the wall in precisely this red line.
Clicking a second time will return to the original mode.
Clearly, every point [resp. line] on the wall corresponds to a line [resp. plane] through the origin. But the converse isn’t true: the vertical plane through the origin, and any line through the origin in this plane, won’t intersect the wall at all. The idea is that these extra lines and plane correspond exactly to what one needs to add to the ordinary plane to obtain the projective plane. In terms of the previous pictures, the lines that intersect the wall correspond to the cards in the square grid. While those parallel to the wall correspond to the direction cards.
So we now have a much cleaner way of explaining what the projective plane is (taking advantage of our freedom to re-interpret the words ‘point’ and ‘line’ as we wish):
This provides us the evidence that construction of many more Dobble Level is possible. This geometry works for construction of more levels than with the wrap-up geometry above.
As evidence of the possibility of more Dobble level sets construction, using JavaScript, we have created an algorithm that generates and displays Dobble set cards for many different levels. In the chooser, you can see all the cards generated for the chosen Dobble Level set.
The unique features of a chooser are:
The purpose of this chooser is not only to let you see the construction of different Dobble-style card sets, but also to prove that these sets follow the finite projective geometry properties we previously mentioned.
We will also use the chooser for more games and applets in other pages.
Link to a standard chooser: Chooser